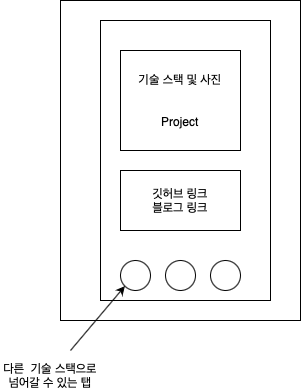
제작 의도
본격적으로 취업 준비에 들어가기 앞서, 내가 했던 공부 및 프로젝트를 보기 좋게 정리하려 한다.
분류는 프론트엔드(HTML+CSS+JS) / 프론트엔드(React, React-Native) / 보안 / iOS로 나누었다.
완성된 포트폴리오는 깃허브 페이지에 업로드한다.
레이아웃 & 기능
카드 형태로 웹, 모바일 어느 곳에서 보아도 어색하지 않도록 한다.
각 기술 스택은 하나의 html 파일로 만들고 아래의 탭을 통해 이동할 수 있도록 한다.
기술 스택마다 프로젝트, 깃허브, 블로그를 링크하고 메뉴 탭을 통해 보고싶은 프로젝트를 선택할 수 있도록 한다.

전체 코드
레이아웃 잡기
HTML file
...생략
<body>
    <section></section>
</body>
CSS file
... 생략

body {
    background-color: #ebfaff;
}

section {
    width: 340px;
    padding: 30px;
    background-color: #fff;
    margin: 50px auto;
    box-shadow: 10px 10px 30px rgba(0, 0, 0, 0.1);
    border-radius: 10px;
}
화면 가운데에 카드 내용이 들어갈 프레임이 생성되었다.
height는 자식 요소로 인해 자동 설정되므로 따로 입력하지 않아도 된다.
다음으로 할 작업은 메뉴 버튼과 메모 버튼을 넣는 것이다.
아이콘은 폰트 어썸의 아이콘을 사용한다.
버튼 추가
HTML file
... 생략
<body>
    <section>
        <nav class="menu">
          <a href="#"><i class="fas fa-bars"></i></a>
          <a href="#"><i class="fas fa-sticky-note"></i></a>
        </nav>
    </section>
</body>
CSS file
... 생략
section nav.menu {
    width: 100%;
}

section nav.menu::after {
    content: "";
    display: block;
    clear: both;
}

section nav.menu a {
    font-size: 20px;
    color: #666;
}

section nav.menu a:nth-of-type(1) {
    float: left;
}

section nav.menu a:nth-of-type(2) {
    float: right;
}
nav의 width는 부모 요소인 section의 100%로 설정한다.
각 아이콘은 float을 통해 좌우 배치하고 ::after를 이용해 해제해준다.
다음 작업은 각 기술별로 알맞는 이미지를 넣고 스택과 프로젝트 링크를 버튼 형식으로 만들 것이다.
이미지 추가 및 기술 스택 설명, 프로젝트 링크
HTML file
<article class="devStack">
    <img src="mainimg/htmlcssjs.png" alt="HTML CSS JS">

    <h1>Front-end</h1>
    <h2>HTML/CSS/JS</h2>

    <a href="BounceBall/BounceBall.html" target="_blank" class="btnView">Bounce Ball</a>
</article>
CSS file
section article.devStack {
    width: 100%;
    text-align: center;
}

section article.devStack img {
    width: 200px;
    height: 200px;
    border-radius: 50%;
    margin-bottom: 20px;
}

section article.devStack h1 {
    font-weight: bold;
    font-size: 22px;
    font-family: Arial, Helvetica, sans-serif;
    line-height: 1;
    color: #555;
    margin-bottom: 5px;
}

section article.devStack h2 {
    font-weight: normal;
    font-size: 12px;
    font-family: Arial, Helvetica, sans-serif;
    line-height: 1;
    color: #bbb;
    margin-bottom: 30px;
}

section a.btnView {
    display: block;
    width: 180px;
    height: 32px;
    margin: 0px auto 20px;
    background-color: #444;
    border-radius: 16px;
    font-weight: bold;
    font-size: 10px;
    font-family: Arial, Helvetica, sans-serif;
    color: #fff;
    line-height: 32px;
    text-align: center;
}
text-align을 center로 설정하여 이미지를 가운데에 배치한 뒤 border-radius를 50%로 설정하여 둥근 형태의 이미지로 만들어준다. btnView에서 border-radius 값은 height의 절반으로 설정하여 좌우 끝 모양이 둥근 버튼을 만들어준다.
다음 작업은 해당 프로젝트의 Github Repository와 주제에 맞는 블로그로 링크를 걸어주는 작업이다.
마찬가지로 아이콘은 폰트 어썸을 사용하며, 구글의 Orbitron 폰트를 사용하기 위해 import 해주어야 한다.
깃허브, 블로그 링크 추가
HTML file
<ul class="visit">
    <li>
        <i class="fab fa-github"></i>
        <span><a href="https://github.com/MoonSangMin/MoonSangMin.github.io" target="_blank">Visit Github Repository</a></span>
    </li>
    <li>
        <i class="fab fab fa-blogger-b"></i>
        <span><a href="https://appdevorsec.tistory.com/category/웹/프론트엔드" target="_blank">Visit my Blog</a></span>
    </li>
</ul>
CSS file
@import url("https://fonts.googleapis.com/css2?family=Orbitron&display=swap");

ul, ol {
    list-style: none;
}

section ul.visit {
    margin-bottom: 25px;
}

section ul.visit li {
    width: 100%;
    padding: 10px 0px;
    border-bottom: 1px solid #eee;
}

section ul.visit li:last-child {
    border-bottom: none;
}

section ul.visit li i {
    width: 20%;
    text-align: center;
    color: #555;
    font-size: 15px;
    text-shadow: 2px 2px 2px #ddd;
}

section ul.visit li span {
    font-weight: normal;
    font-size: 11px;
    font-family: "orbitron";
    color: #555;
    letter-spacing: 1px;
}
li 요소에 각각 padding을 입히고 아래쪽 테두리를 설정한다. 이 때, 마지막 목록은 last-child 선택자로 테두리를 적용하지 않는다.
다음으로 할 작업은 나머지 보안, iOS, 리액트 페이지를 만들고 버튼을 통해 이동할 수 있도록 한다.
버튼 작업
HTML file
<nav class="others">
    <a href="index.html" class="on"></a>
    <a href="second.html"></a>
    <a href="third.html"></a>
    <a href="fourth.html"></a>
</nav>
CSS file
section nav.others {
    width: 100%;
    text-align: center;
}

section nav.others a {
    display: inline-block;
    width: 30px;
    height: 30px;
    border-radius: 50%;
    margin: 0px 10px;
    opacity: 0.4;
    filter: saturate(0.7);
}

section nav.others a.on {
    opacity: 1;
    filter: saturate(1);
}

section nav.others a:nth-of-type(1) {
    background-color: #35e0f7;
    box-shadow: 5px 5px 10px rgba(74, 255, 255, 0.7);
}
section nav.others a:nth-of-type(2) {
    background-color: #55f5cd;
    box-shadow: 5px 5px 10px rgba(85, 245, 178, 0.7);
}
section nav.others a:nth-of-type(3) {
    background-color: #ff80df;
    box-shadow: 5px 5px 10px rgba(255, 128, 223, 0.7);
}
section nav.others a:nth-of-type(4) {
    background-color: #a794fd;
    box-shadow: 5px 5px 10px rgba(167, 148, 253, 0.7);
}
a 태그에 inline-block 속성을 적용하고 border-radius를 50%로 적용하여 동그란 버튼을 만들어준 뒤 각각의 background-color, box-shadow를 설정해준다. 다음으로 현재 보고있는 페이지의 버튼을 활성화시키기 위해 on 클래스를 만들고 opacity, filter로 활성화 여부를 알 수 있도록 한다.
나머지 페이지 생성 및 페이지 별 CSS 수정
HTML file
<!--각 페이지의 body에 클래스를 적용해준다.-->
<body class="htmlcssjs">
CSS file
body.htmlcssjs {
    background-color: #ebfaff;
}
body.htmlcssjs section article.devStack img {
    box-shadow: 5px 15px 20px rgba(173, 216, 230, 0.8);
}
body.htmlcssjs section a.btnView {
    background: linear-gradient(45deg, #4affff, #35e0f7);
    box-shadow: 5px 10px 20px rgba(0, 255, 255, 255, 0.493);
}

body.react {
    background-color: #edffeb;
}
body.react section article.devStack img {
    box-shadow: 5px 15px 20px #bdccb783;
}
body.react section a.btnView {
    background: linear-gradient(45deg, #a0ff9d, #55f5b2);
    box-shadow: 5px 10px 20px rgba(33, 250, 255, 105, 0.3);
}

body.security {
    background-color: #fff3fd;
}
body.security section article.devStack img {
    box-shadow: 5px 15px 30px rgba(252, 99, 214, 0.2);
}
body.security section a.btnView {
    background: linear-gradient(45deg, #ef74ff, #ff11c4);
    box-shadow: 5px 10px 20px rgba(255, 17, 196, 0.357);
}

body.mobile {
    background-color: #f5f0ff;
}
body.mobile section article.devStack img {
    box-shadow: 5px 15px 30px rgba(183, 82, 250, 0.2);
}
body.mobile section a.btnView {
    background: linear-gradient(45deg, #8e74ff, #a011ff);
    box-shadow: 5px 10px 20px rgba(160, 17, 255, 255, 0.4);
}
이제 모든 기본 작업이 끝났다. 추가적으로 해야할 작업은 프로젝트가 더 많이 늘어났을 때, 메뉴 탭을 이용하여 보고싶은 프로젝트를 선택하면 프로젝트 링크 버튼과 Github Repository, 블로그 링크 등을 변경시켜주는 작업을 하고 메모 탭을 이용하여 간단한 설명을 할 수 있도록 업데이트할 예정이다.
수정 내역
2022. 1. 27 모바일에서 볼 때 어색하지 않도록 뷰포트 수정